Mission Statement
Activity Instructions
This activity will have you re-create the University mission statement in HTML and CSS. You will need to pay close attention to detail and apply padding margin, font-size, line-height, letter-spacing, centering and more to get it right. Once we have it styled we will add the ability to switch from a light theme to a dark theme.
Estimated Time: 3 hours
01 Review the mockup
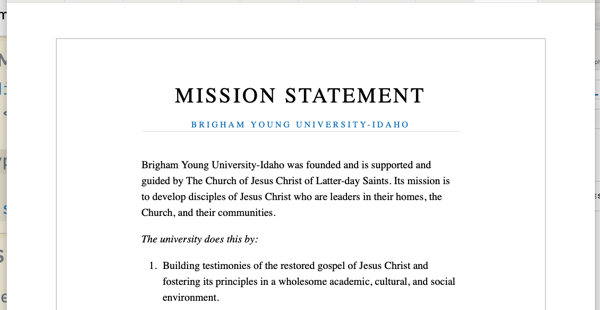
Begin by reviewing the image below to see what we are attempting to create. Try and look for relationships and groupings in the layout that we might need to represent in the HTML.

Create a new folder to hold this project called mission. Then create an html file: index.html and a css file: styles.css. Add the HTML you need to have a valid new page as well as a link element for your CSS.
The
headof an HTML document is more important than we often give credit for. The user does not see what is there, but it is important to the browser, and to search engines. If we want search engines to be able to work with our pages correctly we should include a bit more information in ourhead.
For the rest of the assignments in this course you should include at least the following in yourhead
- Meta Charset Attribute
- Title Element
- Meta Description Element: Short description of the site
- Meta Author Element
- Link reference to your CSS file.
- Script Element (When using Javascript)
For more information see: MDN: What's in the Head?
02 Write the HTML
Next add the HTML to display the content. To save you a bit of time typing the unformatted text has been provided below
Brigham Young University-Idaho was founded and is supported and guided by The Church of Jesus Christ of Latter-day Saints. Its mission is to develop disciples of Jesus Christ who are leaders in their homes, the Church, and their communities.
The university does this by:
Building testimonies of the restored gospel of Jesus Christ and fostering its principles in a wholesome academic, cultural, and social environment. Providing a high-quality education that prepares students of diverse interests and abilities for lifelong learning and employment. Serving as many students as possible within resource constraints. Delivering education that is affordable for students and the Church.
Below you will also find an image for the logo to use.
![]()
You should Right-click→Save image as, and save the image file into the mission directory.
Make sure to refer back to the mockup image above often as you write your HTML. In particular, keep in mind semantics. Try to use semantic elements as much as possible. For example, the top section with the title and subtitle is the header of the document. The section with the text would be the main portion of the content, and the logo at the bottom acts as a sort of footer.
After you have written your HTML compare it to the example below. Your HTML does not have to match this potential solution. There is more than one way to solve this problem. You should however note the differences and think about why.
Please do not copy/paste the HTML below into your document. Your goal in this course is hopefully to learn HTML. Copy/pasting the solution below will not help you with this goal. If you see that you need to make changes to your HTML based on what you see below, fix your code, don't copy/paste.
HTML
<!DOCTYPE html>
<html lang="en">
	<head>
		<meta charset="UTF-8" />
		<title>BYUI Mission Statement</title>
		<link rel="stylesheet" href="mission.css" />
	</head>
	<body>
		<div class="content">
			<header class="title">
				<h1>Mission Statement</h1>
				<h2>Brigham Young University-Idaho</h2>
			</header>
			<main>
				<p>
					Brigham Young University-Idaho was founded and is supported and guided
					by The Church of Jesus Christ of Latter-day Saints. Its mission is to
					develop disciples of Jesus Christ who are leaders in their homes, the
					Church, and their communities.
				</p>
				<p><em>The university does this by:</em></p>
				<ol class="does-list">
					<li>
						Building testimonies of the restored gospel of Jesus Christ and
						fostering its principles in a wholesome academic, cultural, and
						social environment.
					</li>
					<li>
						Providing a high-quality education that prepares students of diverse
						interests and abilities for lifelong learning and employment.
					</li>
					<li>
						Serving as many students as possible within resource constraints.
					</li>
					<li>
						Delivering education that is affordable for students and the Church.
					</li>
				</ol>
			</main>
			<footer>
				<img src="logo.webp" alt="BYUI logo" class="logo" />
			</footer>
		</div>
	</body>
</html>
You may be wondering about the <div class="content"> element that I placed everything in. This is a fairly common practice, but not always necessary. In this case it was used so that some margin could be added around the outside of the bordered box to move it away from the top of the browser window. See below:
03 Style the document.
In the styles.css file begin writing the CSS to make your page match the mockup. Again here are a few details to keep in mind:
- The font size has been set to 20px for the default.
- The font used is the default: Times New Roman
- The color for the subtitle is #006EB6
- Note that while the titles and the main block of content are centered, the paragraphs are left aligned
- The content inside the box has been limited to a maximum width of 600px.
- Remember that
marginadds space between elements, whilepaddingadds space inside of an element. You will need to use both to match the design. - To get the titles to look just right you will need to use the letter-spacing property to space the letters out a bit more than they would normally be. You can also use text-transform to make sure they are always all caps.
- To get yours to match the image you will also need to increase the line-height. (A value of 1.5 is usually nice)
- The image for the logo is larger than we need. You will need to make it smaller. We can use CSS to do this for now. Later we will learn how to actually change the image file. You can use 150px for the size.
04 Organizing our thoughts
We are now ready to add a dynamic feature to our page. We will add some Javascript to allow a user to choose a light or dark theme for the page. Let's begin by creating a list of steps to solve the problem at hand.
- Add a
selectelement to our page with two options: light, dark. Make sure that the light option is first so it comes up by default. - Add a class to
bodycalled "dark" - Define a rule in the CSS with the
.darkselector to make all the changes necessary to convert our design to the dark theme. - After getting the dark theme done remove the
darkclass from thebodyelement. - Create a JS file called
mission.jsand add ascriptelement to our HTML file to link them together. - With JavaScript select the
selectelement out of the DOM. - Add an event listener to the selected element. We should listen for a
changeevent. - Create a function called
changeThemethat will get called by the event listener when the select option is changed.
That function should do the following:- Check to see what option is currently selected on our theme selector.
- If it is "dark" then add the
darkclass to body and change the logo image src to the white logo. - If it is not "dark" then remove the
darkclass from the body element and change the logo image src for the logo to the blue logo.
That is a pretty good list. Let's get started.
05 Modify the HTML
A dropdown list is a great way to offer a user a limited list of
choices. In HTML we create a dropdown with a select element.
Add a select element to the top of your HTML page. It should have two options: light and dark. Use those for both the value and the display of the option. You will probably need to review the link above for help with the syntax.
<option value="dark">Dark</option>Add the class of dark to the body element. We do this now for development purposes. We will remove it once we have our dark theme working and add it back in with Javascript later when needed.
06 Style the dark theme
We will start the dark theme with the following changes: set the background color to #333, a nice dark grey. Then set the font color to white.
Take a look at the page with those changes. What do you notice?
The subtitle we made blue last week. The blue on black is a little hard to read. This could actually be an accessibility issue. Making a site accessible means that we do everything we can to make it work for everyone, including people who may have some sort of disability like vision issues.
Accessibility guidelines recommend that the contrast between colors be at least 4 for smaller text. We can easily check this in Chrome or Firefox. These instructions will assume you are using Chrome.
Open the Developer tools (right-click anywhere on the page and choose "Inspect"
In the "Elements" tab find the h2 element that holds our subtitle and click on it. This will show us the CSS that is being applied to that element. Find the rule that chages the color to blue. You should see a little blue color swatch next to the hexadecimal value. Click on the color swatch.
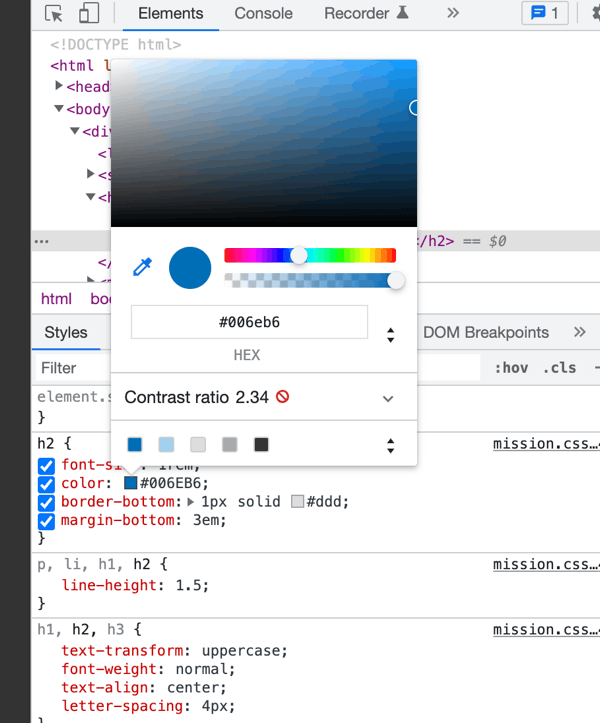
You will see a color picker pop up. One of the bits of information on it is the current foreground/background contrast of colors. Ours is currently 2.34. That is too low! We need a new blue color with better contrast. Many organizations have branding style guides to help establish a brand. BYUI is no exception. Here you can find the BYUI branding guide. Notice there is a colors section. Go check it out.
You can see that the main blue color is "#006EB6". It also lists several more colors below that can be used for accent. Try the different blues in the list to find one with a good contrast. Add a new rule that will change the blue color on the H2 to your lighter blue when the dark theme is set. If you get stuck check out the partial solution below. (Remember that we can write complex selectors to say things like: "Find an H2 that is inside of an element that has a class of "dark")
Partial solution
.dark h2 {
color: somecolor;
}
The last thing that we need to look at is the logo. It is the same blue that the subtitle was, and so has the same contrast issues. If we look at another part of the BYUI branding guide we can see the rules for using the BYUI logo. Notice that when the logo is used on a dark background they recommend white text. Below you will find a new image with white text.
![]()
We won't change the image right now, but will do it later with Javascript. You should grab that image and save it as part of your project.
Once you have the dark theme looking how you would like then remove the dark class from the body.
07 Write the Javascript
Create a file called mission.js in the mission folder. Add a script element to our HTML to link up these two files. Remember to defer your script!
If we review the list of steps above we can see the following is left:
- With JavaScript select the
selectelement out of the DOM. - Add an event listener to the selected element. We should listen for a
changeevent. - Create a function called
changeThemethat will get called by the event listener when the select option is changed. That function should do the following:- Check to see what option is currently selected on our theme selector.
- If it is "dark" then add the
darkclass to body and change the logo image src to the white logo. - If it is not "dark" then remove the
darkclass from the body element and change the logo image src for the logo to the blue logo.
To help you out, below you will find a function that has been started with comments. Use this and complete the task
const themeSelector = // replace with code to select dropdown element out of the HTML (Hint: document.querySelector)
function changeTheme() {
// check to see what the current value of our select is.
// The current value is conveniently found in themeSelector.value!

// if the value is dark then:
// add the dark class to the body
// change the source of the logo img to point to the white logo.
// otherwise
// remove the dark class
// make sure the logo src is the blue logo.
}

// add an event listener to the themeSelector element here.
// Use the changeTheme function as the event handler function.
themeSelector.addEventListener('change', changeTheme);
The code above includes 2 things that you may not have seen before. First is an example of a function in Javascript. Functions are a way to group a set of instructions together and then call them when you need them.
You can see that the function definition starts with the
functionkeyword. Then you have the name of the function. Then you will see an opening and closing parentheses. In this case they are empty, but in other cases we can use them to pass parameters containing important data that the function can use. Finally you have the code that the function will run inside of{ }. You can call/execute/run the function by typing its name followed by parentheses.changeTheme();Second is an example of an event listener. Event listeners are a way to listen for events (click, touch, scroll, change, etc) that happen on the page and then run a function to do something when that event happens.
You may have noticed that even though it was mentioned above that a function is executed by calling it with parentheses, when we used it in the eventListener we omitted the parentheses! We will learn a lot more about event listeners including the reason why the parentheses were not included next week.
We will be using event listeners and functions a lot in this course.
08 Commit and push to Github
Commit your changes, then push them to GitHub. Wait a few minutes then check to make sure they show on Github pages. If you need a review on how to do this check out github instructions. Start around step 3.
After verifying that your page updated, submit the URL to your page in Ilearn. The URL will look something like this: https://githubusername.github.io/wdd131/mission. Make sure to replace "githubusername" with your actual github username 🙂