Working with Forms, Credit Card Info
Activity Instructions
This will have you practice several topics from the last few weeks to create and style a credit card submission form.
Estimated Time: 60 minutes
Our form will be inspired by this codepen example.
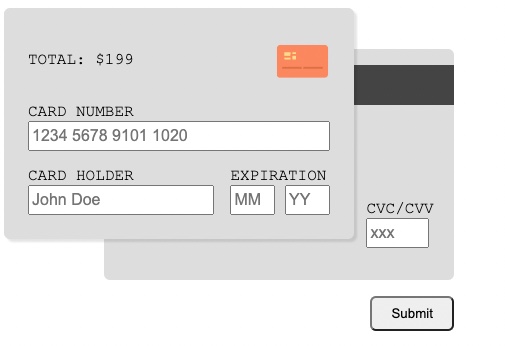
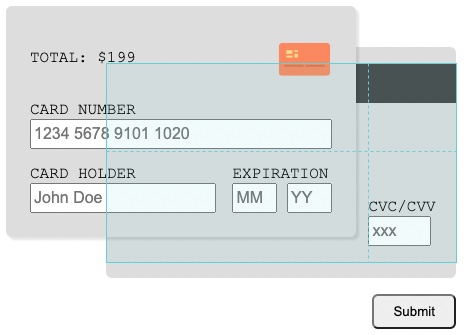
Below you can see a mockup of what we want our form to look like when we are done.
01 Organizing our thoughts.
Whenever you start a new project, it is a good idea to list out the steps we will need to follow in order to solve the problem. If we can make our list in small enough steps, each step becomes trivial. That is the goal.
- Add a new directory to our project called
creditcard. Add anindex.htmland a stylesheet file. Make sure to add a new link to your main index page for your site to this new page. - Add a
formto your page. Inside of that form create an element to act as a card front and another for the card back. Also add a submitbutton. - Using CSS grid place the card front and card back overlapping like the screenshot. Make sure to place the button as well. Do some basic styling on the containers as well...round the corners, add a background color, you could even add a
box-shadowif you wanted. Make sure the back is behind the front. (You can do this either by ordering the HTML elements the right way, or by usingz-indexHigher numbers put things on the top of the stack.) - Begin adding the form elements to the card front and card back. Remember that a good form input should always have a
labelto go along with it! Aplaceholderattribute would also be a good idea. You can use the code below to display the small orange card image.<img class="card-image" src="data:image/svg+xml;base64,PD94bWwgdmVyc2lvbj0iMS4wIiA/PjxzdmcgZGF0YS1uYW1lPSJMYXllciAxIiBpZD0iTGF5ZXJfMSIgdmlld0JveD0iMCAwIDYwIDYwIiB4bWxucz0iaHR0cDovL3d3dy53My5vcmcvMjAwMC9zdmciIHhtbG5zOnhsaW5rPSJodHRwOi8vd3d3LnczLm9yZy8xOTk5L3hsaW5rIj48ZGVmcz48c3R5bGU+LmNscy0xLC5jbHMtMTAsLmNscy0xMSwuY2xzLTIsLmNscy02LC5jbHMtN3tmaWxsOm5vbmU7fS5jbHMtMXtjbGlwLXJ1bGU6ZXZlbm9kZDt9LmNscy0yLC5jbHMtNXtmaWxsLXJ1bGU6ZXZlbm9kZDt9LmNscy0ze2NsaXAtcGF0aDp1cmwoI2NsaXAtcGF0aCk7fS5jbHMtNHtjbGlwLXBhdGg6dXJsKCNjbGlwLXBhdGgtMik7fS5jbHMtNXtmaWxsOiNmZTg2NTc7fS5jbHMtMTAsLmNscy0xMSwuY2xzLTZ7c3Ryb2tlOiNmZTg2NTc7fS5jbHMtMTAsLmNscy02e3N0cm9rZS1saW5lY2FwOnJvdW5kO30uY2xzLTEwLC5jbHMtMTEsLmNscy02LC5jbHMtN3tzdHJva2UtbGluZWpvaW46cm91bmQ7fS5jbHMtNntzdHJva2Utd2lkdGg6NHB4O30uY2xzLTd7c3Ryb2tlOiNlMDZjM2U7fS5jbHMtMTEsLmNscy03e3N0cm9rZS1saW5lY2FwOnNxdWFyZTt9LmNscy0xMCwuY2xzLTExLC5jbHMtN3tzdHJva2Utd2lkdGg6MnB4O30uY2xzLTh7Y2xpcC1wYXRoOnVybCgjY2xpcC1wYXRoLTQpO30uY2xzLTl7ZmlsbDojZmZkYzgyO308L3N0eWxlPjxjbGlwUGF0aCBpZD0iY2xpcC1wYXRoIj48cGF0aCBjbGFzcz0iY2xzLTEiIGQ9Ik0xLDQ2VjE4YTUsNSwwLDAsMSw1LTVINTRhNSw1LDAsMCwxLDUsNVY0NmE1LDUsMCwwLDEtNSw1SDZBNSw1LDAsMCwxLDEsNDZabTIsMGEzLDMsMCwwLDAsMywzSDU0YTMsMywwLDAsMCwzLTNWMThhMywzLDAsMCwwLTMtM0g2YTMsMywwLDAsMC0zLDNWNDZaTS0xOSw3MUg3OVYtN0gtMTlWNzFaIi8+PC9jbGlwUGF0aD48Y2xpcFBhdGggaWQ9ImNsaXAtcGF0aC0yIj48cGF0aCBjbGFzcz0iY2xzLTEiIGQ9Ik0yLDQ2YTQsNCwwLDAsMCw0LDRINTRhNCw0LDAsMCwwLDQtNFYxOGE0LDQsMCwwLDAtNC00SDZhNCw0LDAsMCwwLTQsNFY0NloiLz48L2NsaXBQYXRoPjxjbGlwUGF0aCBpZD0iY2xpcC1wYXRoLTQiPjxwYXRoIGNsYXNzPSJjbHMtMSIgZD0iTTksMjlhMiwyLDAsMCwwLDIsMkgyMmEyLDIsMCwwLDAsMi0yVjIzYTIsMiwwLDAsMC0yLTJIMTFhMiwyLDAsMCwwLTIsMnY2WiIvPjwvY2xpcFBhdGg+PC9kZWZzPjx0aXRsZS8+PGcgY2xhc3M9ImNscy0zIj48ZyBjbGFzcz0iY2xzLTQiPjxwYXRoIGNsYXNzPSJjbHMtNSIgZD0iTTIsNDZhNCw0LDAsMCwwLDQsNEg1NGE0LDQsMCwwLDAsNC00VjE4YTQsNCwwLDAsMC00LTRINmE0LDQsMCwwLDAtNCw0VjQ2WiIvPjwvZz48L2c+PGcgY2xhc3M9ImNscy00Ij48cGF0aCBjbGFzcz0iY2xzLTYiIGQ9Ik0yLDQ2YTQsNCwwLDAsMCw0LDRINTRhNCw0LDAsMCwwLDQtNFYxOGE0LDQsMCwwLDAtNC00SDZhNCw0LDAsMCwwLTQsNFY0NloiLz48L2c+PGxpbmUgY2xhc3M9ImNscy03IiB4MT0iOSIgeDI9IjI4IiB5MT0iMzkiIHkyPSIzOSIvPjxsaW5lIGNsYXNzPSJjbHMtNyIgeDE9IjMyIiB4Mj0iNTEiIHkxPSIzOSIgeTI9IjM5Ii8+PGcgY2xhc3M9ImNscy04Ij48cmVjdCBjbGFzcz0iY2xzLTkiIGhlaWdodD0iMjAiIHdpZHRoPSIyNSIgeD0iNCIgeT0iMTYiLz48L2c+PHBhdGggY2xhc3M9ImNscy0xMCIgZD0iTTksMjlhMiwyLDAsMCwwLDIsMkgyMmEyLDIsMCwwLDAsMi0yVjIzYTIsMiwwLDAsMC0yLTJIMTFhMiwyLDAsMCwwLTIsMnY2WiIvPjxsaW5lIGNsYXNzPSJjbHMtMTEiIHgxPSIxOCIgeDI9IjE4IiB5MT0iMzEiIHkyPSIyMSIvPjxsaW5lIGNsYXNzPSJjbHMtMTEiIHgxPSI5IiB4Mj0iMTciIHkxPSIyNyIgeTI9IjI3Ii8+PGxpbmUgY2xhc3M9ImNscy0xMSIgeDE9IjE4IiB4Mj0iMjQiIHkxPSIyNSIgeTI9IjI1Ii8+PC9zdmc+" height="55px"> - Create a grid for the card front and position all the elements based on the mockup.
- Do the same for the card back.
- Use margin, padding, and alignment properties to finish up the layout.
- Add some HTML validation to your form inputs. For example, all of the fields should be required. Some should have specific lengths, etc.
02 Hints and Tips
If you are having difficulties working through the list of steps above, scan through the list below and see if there is something that can help!
HTML structure of the form elements
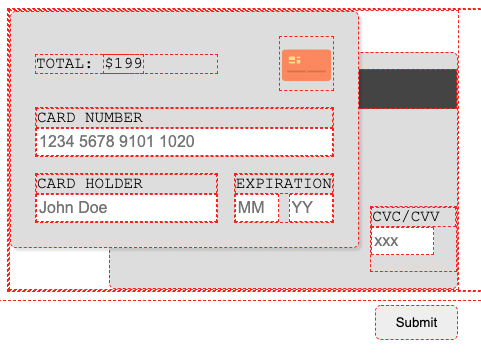
Getting your HTML structure correct can make a big difference in how smoothly your layout comes together. See the screenshot below for an example of how you might group certain elements in your HTML. Each of the red boxes represents an HTML element. Notice how each item that I wanted to place directly on the grid is grouped together with an element.
Main Grid
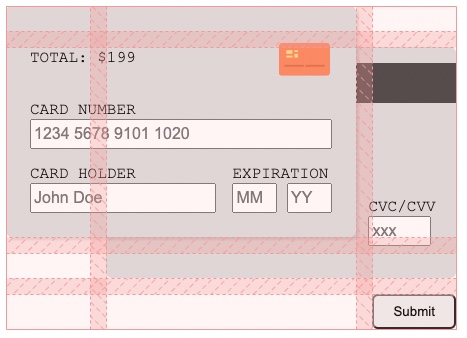
If you are having a hard time getting the main grid to work (this is the one that places the card front, card back, and submit button) take a look at the screenshot below for some hints. (the wide darker lines indicate that a gap was used).
Card Front Grid
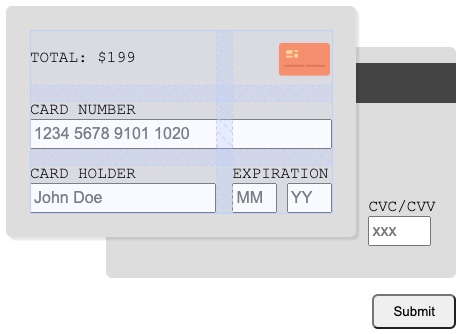
If you are having a hard time getting the card front grid to work, take a look at the screenshot below for some hints. (the wide darker lines indicate that a gap was used). Notice as well that there is a space all the way around the grid...how does one add space on the inside of an element?
Card Back Grid
If you are having a hard time getting the card back grid to
work, take a look at the screenshot below for some hints. Notice
as well that there is a space on the top and bottom of the
grid...how do you add space on the inside of an element?
To create the dark grey bar on the card back you can just use an empty div. Set a background-color, and a height, then position it in your grid.
Spacing and alignment.
Because we are using CSS Grid we have access to all of it's
alignment properties. These include
justify-content, justify-items, align-items, align-self, justify-self. You can review this CSS Grid Cheatsheet for a refresher about what each does if you need it.
You can accomplish a lot with some well placed margin and padding as well!
03 Add a Favicon
Part of your exploration this week was on Favicons. Apply what you learned by adding a favicon to this page. You can easily create a custom one.
- Open up the Pixlr editor. (If you have another editor you like you can use that as well)
- Click "Create new", switch to the Web tab and select "Icon 32"
- Select the Text tool and click on the image (You may find this easier if you zoom in to make it bigger) Set the font size to about 18-20 and enter "131" (or your initials if you would like). Center the text and change the color to something you like.
- Save your image in the
creditcarddirectory asfavicon.png - Add the
linkto your HTML file to use your new favicon
04 Commit and push to Github
Commit your changes, then push them to GitHub. Wait a few minutes then check to make sure they show on Github pages. If you need a review on how to do this check out github instructions. Start around step 3.
Remember your metadata! This week we have another new addition.
- Meta Charset Attribute
- Title Element
- Viewport Meta Element
- Meta Description Element: Short description of the site
- Meta Author Element
- Favicon link: New
- Link reference to your CSS file.
- Script Element linking to a Javascript file (When using Javascript)
For more information see: MDN: What's in the Head?
After verifying that your page updated, submit the URL to your page in Ilearn. The URL will look something like this: https://githubusername.github.io/wdd131/creditcard. Make sure to replace "githubusername" with your actual github username :)