Character Card
Activity Instructions
This activity will have you create a page with a character card. It should bring in the character image, name, class, level, and health dynamically from an object in JS. The object will also have 2 methods that we will call in code as the user clicks buttons.
Estimated Time: 2 hours
01 Review and plan
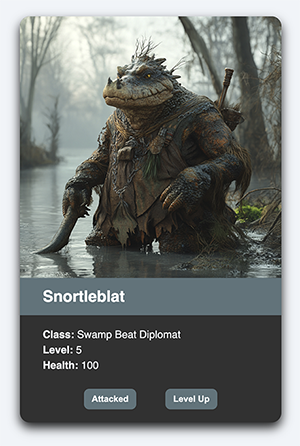
Begin by reviewing the image below to see what the webpage will look like. You can use the indicated image, colors and fonts or you can choose some of your own.
Create a new folder to hold this project called character-card. Then create an html file: index.html, a javascript file: script.js, and a css file: styles.css. Add the HTML provided.
<!DOCTYPE html>
<html lang="en">
<head>
  <meta charset="UTF-8" />
  <meta name="viewport" content="width=device-width, initial-scale=1.0"/>
  <title>Character Card</title>
  <link href="styles.css" rel="stylesheet">
</head>
<body>

  <div class="card">
    <img class="image" src="#" alt="#">
    <div class="name"></div>
    <div class="stats">
      <p><strong>Class:</strong> <span id="class"></span></p>
      <p><strong>Level:</strong> <span id="level"></span></p>
      <p><strong>Health:</strong> <span id="health"></span></p>
    </div>

    <div class="buttons">
      <button id='attacked'>Attacked</button>
      <button id='levelup'>Level Up</button>
    </div>

    <p id="log"></p>
  </div>

  <script src="script.js"></script>
  </body>
</html>
Make sure to add a new link to the site /index.html file as well!
02 Code the Object
Next add the JS Object in your .js file. This object called 'character' has 4 properties (name, class, level, and health) and 2 methods (attacked and levelUp).
const character = {
      name: "Snortleblat",
      class: "Swamp Beast Diplomat",
      level: 5,
      health: 100,
      image: 'https://andejuli.github.io/wdd131/character_card/snortleblat.webp',
      attacked() {
        if (this.health >= 20) {
          this.health -= 20;
        } else {
            alert('Character Died');
        }
      },
      levelUp() {
        this.level += 1;
        this.health += 20;
      }
    };
We are using these properties to dynamically load our page and the methods will be used as the user interacts with buttons on the page.
03 Begin styling
Copy the following styles into the .css file:
body {
  font-family: Palatino Linotype, sans-serif;
  background: #f0f4f8;
}
.card {
  background: #313131;
  border-radius: 15px;
  box-shadow: 0 8px 16px rgba(0,0,0,0.9);
  width: 400px;
  margin: 100px auto;
}
.image{
  width: 400px;
  height: 400px;
  border-radius: 15px 15px 0 0;
  }
.name {
  font-size: 1.5em;
  font-weight: bold;
  margin: -4px 0 20px 0;
  color: white;
  padding: 15px 0 15px 35px;
  background-color: #5d747b;
}
.stats {
  margin: 10px 15px 7px 35px;
  text-align: left;
}
.stats p {
  margin: 5px 0;
  color: #f0f4f8;
}
.buttons {
  text-align: center;
}
button {
  padding: 8px 12px;
  margin: 20px;
  border: none;
  border-radius: 8px;
  background-color: #5d747b;
  color: white;
  font-weight: bold;
  cursor: pointer;
  transition: background-color 0.5s ease;
}
button:hover {
  background-color: #58605a;
}
04 Make it dynamic
Target elements in the DOM and then assign them properties from our object to display the name, class, level, and health of our character.
Listen for events that fire when user click the 'Attacked' and 'Level Up' buttons. Use the character methods .attacked() and .levelUp() to increase and decrease the level and health properties.
The DOM properties will need to be updated each time the button is pressed as well. Think about placing the updates in a function that is called when the page first loads and each time the buttons are clicked.
05 Add Social Media Meta information
You should have done some exploration this week about Social Media Meta tags. These meta tags give social media sites the information they need to display a nice summary of our site for easy posting to social media. We should add some tags to our website so people can share our content on their social media platforms. Here's an example of the recommended tags:
<meta property="og:title" content="Page Title">
<meta property="og:type" content="website" />
<meta property="og:description" content="Page Description">
<meta property="og:image" content="URL to an image">
<meta property="og:url" content="URL of the page">
<meta name="twitter:card" content="summary_large_image">
ogstands for Open Graph, a format developed by Facebook that many social media sites understand now. There are a lot of options for properties to include. The list above is considered a good starting point for most sites.
Add those to the head of the document, then change the values to reflect the content of the page. You can see a list of valid types on the open graph website.
You may be wondering what to put in for all those values? Well, you can use the same values you used for the
titleanddescriptionmeta tags on your page for the equivalent og tags. The image should be something that represents your page. This is the image that will be shown when someone shares your page on social media. Theurlshould be the URL of the page you are on. Thetwitter:cardis an X social media specific tag that tells X how to display the page when someone shares it. Thesummary_large_imagetells X to use the image you provided as the main image for the page.
06 Check with Lighthouse
Open your page in Chrome, and access the Lighthouse tool. Run it for mobile first. How does it look? Read through the errors and recommendations. Make changes to get the scores as close to 100 as you can! You should be able to get to at least 95-96%. Performance might be a bit lower due to the 'hotlinked' images and that is ok for this assignment.
07 Commit and push to Github
Commit your changes, then push them to GitHub. Wait a few minutes then check to make sure they show on Github pages. If you need a review on how to do this check out github instructions. Start around step 3.
Remember your metadata! This week we have another new addition.
- Meta Charset Attribute
- Title Element
- Viewport Meta Element
- Meta Description Element: Short description of the site
- Meta Author Element
- Favicon link
- Link reference to your CSS file.
- Social Media Meta: New
- Script Element linking to a Javascript file (When using Javascript)
For more information see: MDN: What's in the Head?
After verifying that your page updated, submit the URL to your page in Ilearn. The URL will look something like this: https://githubusername.github.io/wdd131/character-card. Make sure to replace "githubusername" with your actual github username :)