Build a blog part II
Activity Instructions
This week we will take the simple blog site that you started developing last week and finish the styling for it so that it matches the mockup. We will also then make the page somewhat dynamic by generating some of the markup for the page with Javascript.
Estimated Time: 90 minutes
01 Finish styling the articles.
The main part of the page that we have yet to style is the article. We began last week by adding a grid to accomplish some of the layout.
Review once again the mockup below then make a list of steps that you can see need to be done to make our page match the mockup. Once you have created your list compare it to the one below.
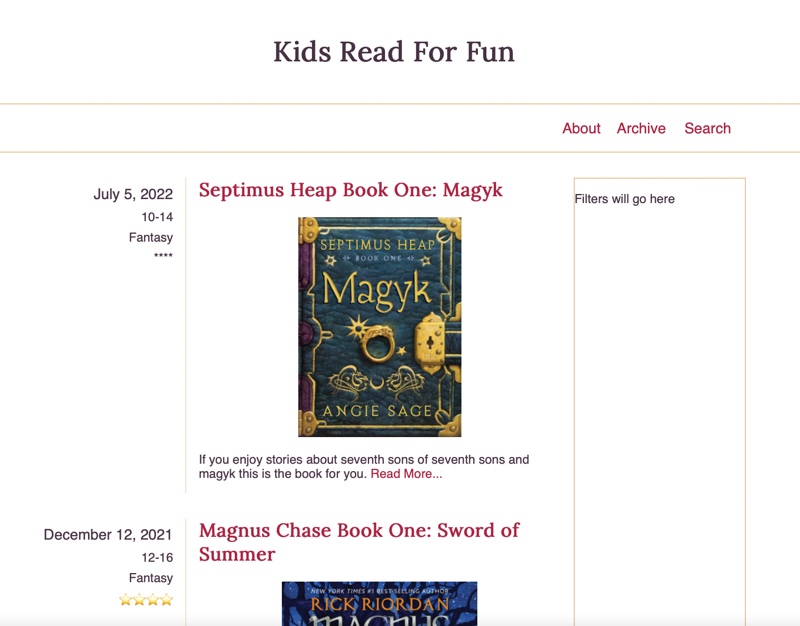
Article List of steps
- The size of the font for the date of the article should be increased
- The list of details on the left should all be right aligned.
- The space between the lines of the list of details on the left should be slightly reduced.
- Add a right border to the container holding the list of details and add spacing on the left and right of that to match the mockup.
- Adjust the top margin of the title of the post so that it lines up vertically with the date on the left.
- Center the image of the bookcover.
- Add some space in between the two articles- Since we restricted the width on the navbar last week (review that CSS rule if you need to) we should do the same to the
mainelement as well so that it matches and we end up with nice alignment.
How did you do? Did you notice all of the details?
Using the list above as a guide, write the CSS to style the articles.
02 Add some Javascript
If this were a real blog site it would be nice if we didn't have to change the index page each time we added a new post. Many sites operate in this way. In order to do this we need to dynamically generate the HTML markup for the articles instead of having it be hard coded in the HTML file.
Last week you were instructed to download a blog.js file and add it to the blog/ directory. That file contains a variable called articles that contains an array of information about articles. We can use that array to build out the HTML markup we need to dynamically build the list of articles on our page.
On a real site the articles data would be pulled stored in a database and requested as needed. In order to keep ours simple we will just store it in a variable locally.
To proceed, connect your new JS file to the index.html file in that directory by adding a script element. Don't forget to defer!
Just like we did above with the CSS, it would be good to come up with a list of steps to follow in order to solve our problem.
- Get a reference to the element we want to insert our articles into. You may need to add a class or ID to the element your articles are currently in to do this. (document.querySelector)
- For each article in our list:
- Create a new
articleelement. If you have any classes on your hard coded articles in your index.html, add those to your new element in Javascript. - Create a template literal string and store it in a variable. The contents of this string should be a copy/paste of the contents of one of your current
articlesfrom the HTML file. - Everywhere in the copy/pasted HTML where there is information specific to this post we should replace it with the data from the current article. (${item.date})
- Set the
innerHTMLof the new article to the template literal string we just built.
- Create a new
- Append the new article to the output element so it will show on the page.
Create one or more functions that will be responsible to build and output the HTML necessary to display the list of articles.
The
articlesvariable you were given is an array of objects. We will learn more next week about creating objects, but we have already been using them without knowing. For example thedocumentwe reference when we do something likedocument.querySelector()is an object that hasproperties, andmethods(functions) that belong to it. when we want to reference a certain part of the object we use the dot operator.So if we wanted to use the title of the first object in our
variablesarray we would writearticles[0].title. We can use a loop such as theArray.forEachloop we studied this week to make it easy to access each object in the array one at a time no matter how many items there are in the array.
03 Cleanup/Add a new post.
Once you have the Javascript working and it is adding the articles dynamically you might notice that you have two copies of each article on your page. Go into the index.html file and remove the HTML that produces the articles. We don't need it anymore.
For fun let's see how easy it would be to add an new article. In the blog.js file, look at the articles variable. Copy the following JS object with information about another book into the array that contains information about our books. Paste it below the last item in the array (don't forget to add a comma).
{
id: 3,
title: "Belgariad Book One: Pawn of Prophecy",
date: "Feb 12, 2022",
description:
"A fierce dispute among the Gods and the theft of a powerful Orb leaves the World divided into five kingdoms. Young Garion, with his 'Aunt Pol' and an elderly man calling himself Wolf --a father and daughter granted near-immortality by one of the Gods -- set out on a complex mission.",
imgSrc:
"https://images-na.ssl-images-amazon.com/images/I/41ZxXA+nInL.jpg",
imgAlt: "Book cover for Pawn of Prophecy",
ages: "12-16",
genre: "Fantasy",
stars: "⭐⭐⭐⭐⭐"
}
The final array would look something like below:
const articles = [
{
id: 1,
title: "Septimus Heap Book One: Magyk",
date: "July 5, 2022",
description:
"If you enjoy stories about seventh sons of seventh sons and magyk this is the book for you.",
imgSrc: "https://upload.wikimedia.org/wikipedia/en/5/5f/Magkycover2.jpg",
imgAlt: "Book cover for Septimus Heap 1",
ages: "10-14",
genre: "Fantasy",
stars: "****"
},
{
id: 2,
title: "Magnus Chase Book One: Sword of Summer",
date: "December 12, 2021",
description:
"The anticipated new novel by Rick Riordan. After Greek mythology (Percy Jackson), Greek/Roman (Heroes of Olympus), and Egyptian (Kane Chronicles), Rick decides to try his hand with Norse Mythology, and the end result is good.",
imgSrc:
"https://books.google.com/books/content/images/frontcover/xWuyBAAAQBAJ?fife=w300",
imgAlt: "Book cover for Magnus Chase 1",
ages: "12-16",
genre: "Fantasy",
stars: "⭐⭐⭐⭐"
},
{
id: 3,
title: "Belgariad Book One: Pawn of Prophecy",
date: "Feb 12, 2022",
description:
"A fierce dispute among the Gods and the theft of a powerful Orb leaves the World divided into five kingdoms. Young Garion, with his 'Aunt Pol' and an elderly man calling himself Wolf --a father and daughter granted near-immortality by one of the Gods -- set out on a complex mission.",
imgSrc:
"https://images-na.ssl-images-amazon.com/images/I/41ZxXA+nInL.jpg",
imgAlt: "Book cover for Pawn of Prophecy",
ages: "12-16",
genre: "Fantasy",
stars: "⭐⭐⭐⭐⭐"
}
];
Save the file and look at your page. You should now have three articles listed!
04 Commit and push your work.
Commit your changes, then push them to GitHub. Wait a few minutes then check to make sure they show on Github pages. If you need a review on how to do this check out github instructions. Start around step 3.
After verifying that your page updated, submit the URL to your page in Ilearn. The URL will look something like this: https://githubusername.github.io/wdd131/blog. Make sure to replace "githubusername" with your actual github username :)